If you and another person are editing a file at the same time and both
of you have unsaved changes, you’ll see a red Dropbox badge with an
exclamation mark. At this point you can create a conflicted copy
Sunday, November 17, 2019
Thursday, November 14, 2019
Remove and clear all filters applied in selected folder
Step 1: Click to open the folder that you will clear filters from. In our case, we open the Inbox.
Step 2: To open the Advanced View Settings dialog box:
Step 2: To open the Advanced View Settings dialog box:
- In Outlook 2010 and 2013, please click the View Settings button on the View tab;
- In Outlook 2007, please click the View > Current View > Customize Current View.
- Step 3: In the popping up dialog box, please click the Filter button.

Step 4: Then click the Clear All button in the Filter dialog box.

Step 5: Click both OK buttons in two dialog boxes.
Then all filters applied in the opening folder is removed immediately.
Wednesday, November 13, 2019
What is the difference between 2.4 GHz and 5 GHz wireless frequencies?
The primary differences between the two frequencies are the range (coverage) and bandwidth (speed) that the bands provide. The 2.4 GHz band provides coverage at a longer range but transmits data at slower speeds. The 5 GHz band provides less coverage but transmits data at faster speeds.
In simple words
- 5Ghz wifi is high speed as well as low area covering because of shorter wavelength
- 2.5Ghz wifi is less speed and more area covered because of low frequency than 5 ghz .
Tuesday, November 5, 2019
How to Update WhatsApp on Android
- Go to Google Play store;
- Choose "My apps & games";
- On the installed apps list, see if WhatsApp has new update;
- Tap "WhatsApp" > "Update". ...
How to set Fingerprint Unlock for WhatsApp
How to set Fingerprint Unlock for WhatsApp
WhatsApp has finally rolled out the Fingerprint Unlock feature for Android users. The new feature adds an extra layer of security to your WhatsApp messages and media.
1. Open WhatsApp
2. Go to Settings.
3. Look for Privacy and tap on it,
4. Tap on Fingerprint lock option.
5. You will be taken to a new screen. Scan your fingerprint to confirm the authentication.
Users who update the new version of WhatsApp will have to scan a fingerprint to open up the Facebook-owned platform.

Monday, October 28, 2019
Connect to a projector or PC
press the Windows logo key + P, and then choose one of the four options:
- PC screen only.
You'll see everything on your PC. (When you're connected to a wireless
projector, this option changes to Disconnect.)
- Duplicate. You'll see the same things on both screens.
- Extend. You'll see everything across both screens, and you can drag and move items between the two.
- Second screen only. You'll see everything on the connected screen. The other screen will be blank.
Then again, you might not even need a cable. If your PC and the projector both support Miracast, press the Windows logo key + P, select Connect to a wireless display, choose a projector, and you're set.
Thursday, October 24, 2019
Turn off Calendar Alert in Outlook 2016
- Go to File | Options.
- Select Calendar from the left hand menu.
- To turn default reminders on or off for all new appointments or meetings, under Calendar options, select or clear the Default reminders check box.
Wednesday, October 23, 2019
Find your IMEI number on your phone
Find your IMEI number on your phone
The IEMI also known as International Mobile Station Equipment Identity is a unique number given to a mobile phone, as well as some satellite phones. The IEMI number can be found inside the phone or alternatively you can view the IEMI number by typing in *#06# on your mobile phone keypad.
Finding your IEMI number
- You can find your IEMI number by typing *#06# on the kepay of your handset this will show the IMEI number of the handset you are using
The IEMI number is used to identify if a mobile hanset has been stolen.
Tuesday, October 22, 2019
Common Health Problems Caused by Computer Use

- Muscle Problems
- Vision Problems
- Headache
- Stress
- Obesity
- Repetitive Stress Injury
- Radiation
Windows 10 Shortcut Keys
Windows 10 Shortcut Keys
- Windows Key + A: Opens Windows 10 notifications
- Windows Key + I: Opens Windows 10 settings
- Windows Key + Ctrl
+ D: Creates new
virtual desktop
- Windows Key + Ctrl
+ F4: Closes current
virtual desktop
- Windows Key + Ctrl
+ Left or Right: Switches between
virtual desktops
- Windows Key + F1: Opens Edge and Searches "How do I
get help in Windows 10" with Bing (formerly opens Help)
- Windows Key + Print
Screen Key: Creates a
screenshot of the whole screen in the Photos
app. More screenshot key commands can be found
- Windows Key: Shows the Windows 10 Start Menu
- Windows Key + L: Locks your Windows 10 device
- Windows Key + Tab: Launches Windows 10 Task View
- Windows Key +
Enter: Opens Narrator,
a program that reads text for you and shows you tips.
Desktop Commands Shortcuts
- Windows Key + X: Opens Start button context menu
- Windows Key + Left,
Right, Up or Down: Moves the active
window around on your screen. Left and Right snap the window to
either side so it takes up half of the screen, Up and Down shrink the window to
a quarter-size and move it to that corner. Once you have used Windows Key
+ Up to place it in the top corner, pressing that command again makes the
window take up your whole screen. If you have hit Windows Key + Down
to place a window in the bottom corner, hitting that command again
minimizes the window.
- Windows Key + D: Show Windows desktop (also available
with Windows Key + M)
- Windows Key +
,: Temporarily show
desktop
Connecting and Sharing
- Windows Key + H: Share content (if supported by current app)
- Windows Key + K: Connect to wireless displays and audio
devices
- Windows Key + E: Open Windows Explorer
Traditional Keyboard Shortcuts
- Windows Key + Space: Switch keyboard input language (if you
have added at least a second one)
- Windows Key + Shift
+ Left or Right: Move current Window
from one monitor to another (when using a multiple monitor setup)
- Windows Key + 1, 2,
3 and so on: Open programs that are
pinned to task bar
- Windows Key +
R: Run a command
- Windows Key + P: Project a screen
- Alt + Tab: Switch to previous window
- Windows Key + T = Cycle through screenshots of open apps
- Alt + F4: Close current window, but if you perform this combination when viewing the desktop, you open Power dialogue to shut down or restart Windows, put your device in sleep mode, sign out or switch the current user.
Thursday, October 17, 2019


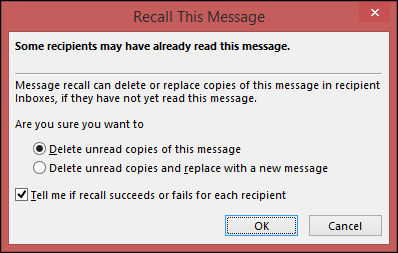
Recall and replace a message - Outlook
- In the folder pane on the left of the Outlook window, choose the Sent Items folder.
- Open the message that you want to recall. You must double-click to open the message. Selecting the message so it appears in the reading pane won't allow you to recall the message.
- From the Message tab, select Actions > Recall This Message.

Click Delete unread copies of this message or Delete unread copies and replace with a new message, and then click OK.
 |
| Binoj |
Monday, October 14, 2019
How to Turn off Windows Updates in Windows 10
Step 1: Go to Control Panel > Administrative Tools > Services. In the Services window, scroll down and select Windows Update.
Step 2: Right-click and select Properties.

Step 3: Under
the General tab > Startup Type, select disabled. That will take care
of Windows Updates not being installed on your machine.

Saturday, August 10, 2019
How to enable debugger
How to enable debugger
"X++ debugging is not enabled for code running on Application Object Server"

Solution for this Warning: open Ax Server Configuration>In Application Object Server tab set to true enable breakpoints to debugg X++ code running on this server
Friday, August 2, 2019
The X++ debugger works only for users who are in the 'Microsoft Dynamics AX debugging users' local group of windowS
- From the Start menu, point to All Programs, click Administrative Tools, and then click Services.
- In Services, right-click the Microsoft Dynamics AX Object Server service and then click Properties.
- In the Properties window, on the Log On tab, the AOS service account is specified in the This account field.
To add the AOS service account to the debug group
- From the Start menu, point to All Programs, click Administrative Tools, click Computer Management, and then click Local Users and Groups.
- In Local Users and Groups, double-click Groups, right-click Microsoft Dynamics AX Debugging Users and click Add to Group.
- In the Properties window, click Add and add the AOS service account to the group.
- Restart the machine
Thursday, July 18, 2019
How to format a USB drive to FAT32 on a Mac
How to format a USB drive to FAT32 on a Mac
Formatting would erase data completely, make sure that you have a data backup.You want to be able to use the drive on a Windows PC, as well as a Mac — perhaps to transfer files between the two machines.
.
The fact that Fat32 can be read from and written to on both Mac and Windows makes it very versatile. However, there is a significant limitation — individual files have a maximum size of 4GB. So, if you’re using the USB drive to store large video files, you may run into trouble. There is a solution, however, exFAT. Unlike FAT32, exFAT doesn’t have a maximum file limit. Better still, it can be read from and written to on any Mac running Mac OS X Snow Leopard or later and on Windows.
To format a USB drive in FAT32 or exFAT:
1. Plug the USB drive into your Mac.
2. Go to Applications>Utilities and launch Disk Utility.
3. Click on the USB drive in the sidebar in Disk Utility.
4. Click Erase in the Disk Utility toolbar.
5. Type in a name for the formatted disk.
6. Click on the Format menu and choose either MS-DOS (FAT32) or ExFAT.
7. Click Erase.
Tuesday, July 16, 2019
How To Setup An Archive Folder in Outlook for MAC.
Outlook 2011 for Mac
You would need to create Archive folder on the local computer. To un-hide On My Computer folder:In Outlook 2011, click on the Outlook menu at the top of your screen, Select "Preferences", uncheck the box "Hide On My Computer Folders".
To create local archive folder right-click or (ctrl/click) on the "On My Computer", then select "New Folder".

Outlook 2016 for Mac
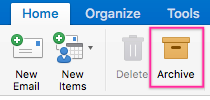
NOTE: The archive button is available on Exchange 2016.To create an archive folder choose one or more messages that you would like to archive, select "Archive" on the ribbon.
As soon as you choose "Archive", you will get a prompt the "Archive" folder for "Microsoft" does not exist, to proceed click the "Continue" button.
The Archive folder will be automatically created.

To set up archiving rule
- In Outlook 2011 or 2016 for Mac, go to "Tools", then select "Rules".
The other option is to go to "Rules" from the ribbon and select "Edit rules".
- Select Exchange on the left pane menu and click
on '+'
to add a new rule:

- Give the rule a name and specify the conditions using drop-down lists as follows:
- If all conditions are met: Selected.
- When a new message arrives: Date Received | is greater than | enter any number | days old.
- Do the following: Move Message | any folder on your computer.
- Do not apply other rules to messages that meet these conditions: Enabling this option is up to you and depends on your other rules.
- Enabled:
Checked.

- Click "OK" and save the rule.
- Apply the rule by clicking on the source folder,
then select "Rules", then "Apply" and select the name of the rule you just made.

- When you export the data from Archive folder, you select "File", then "Export".
The next window comes up, select types of items that should be included in the archive file, then click the "Continue" button.
- On next dialog window type the name of the archive file
and select the location on your MAC, where the file should be stored, then click the "Save" button.

NOTE: This rule may run a long time the first time you run it depending on your mailbox size. - After the archive is completed, you will find the .olm file
with your mailbox items saved on the Mac.

- To confirm the items are in the file. Click on "File", then "Import", then select "Outlook for Mac Archive" file, then select the file.
The file should displayed the list of folders. If all items are in place, you may clean out the archive folder.
Archive messages in Outlook for Mac
Archive messages in Outlook for Mac
Outlook for Office 365 for Mac
Outlook 2016 for Mac
Outlook 2019 for Mac
Archive messages with a single click
You can archive messages in any of the email accounts that you've connected to Outlook 2016 for Mac. These include Exchange (version 2016 and later), Office 365, Outlook.com, Hotmail, iCloud, Google, and Yahoo!-
Choose one or more messages in your folder to archive.
-
On the ribbon, choose Archive.
-
As soon as you choose Archive, messages are immediately moved to the archive folder you've specified. If you archive a message by mistake, go to the archive folder and move the message back to your Inbox.
First time using the archive?
If you haven't previously set up an archive folder for an email account, you'll get this prompt: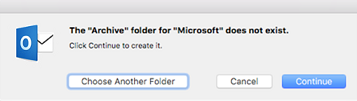
Choose one of the following:
Continue. A new folder will appear in your folder list for that email account. You'll have to repeat this process to create an archive folder for each of your email accounts. The folder will be called Archive for Office 365, Outlook.com, Hotmail, iCloud, Google, and Yahoo! accounts. The archive folder for Gmail is called All Mail.
Thursday, July 11, 2019
How do I open a Rhino 6 file in Rhino 5 or 4 ?
Save the file as a Rhino 5 or Rhino 4 model like this:


Wednesday, July 3, 2019
msn.com launches on startup Windows 10
Open Regedit:
(Windows + R Keys simultaneously to open Run Dialog and type regedit, hit enter)
Navigate to this Key and if it exists, change the value from 1 to 0
HKEY_LOCAL_MACHINE\SYSTEM\CurrentControlSet\Services\NlaSvc\Parameters\Internet\EnableActiveProbing
Monday, January 7, 2019
“There was a problem sending the command to the program
- Open Excel 2007.
- Open the Menu in the top left.
- Click the “Excel Options” button.
- Click the advanced tab on the left of the options screen.
- Under the general options uncheck the box “Ignore other application that use Dynamic Data Exchange (DDE)”
Barcode Printing Issues in AX
Copy the font from the Windows\Fonts folder on the AX client machine to the AOS and the SSRS server Windows\Fonts folder.
Once the font has been manually installed restart the SSRS Service and AOS Service.
If the above does not work uninstall the font, reboot the SSRS server and copy the font again (you may need to reboot again).
The MICR font file is IDAutomationMICR.TFF, but the barcode font will depend on how you setup the barcode in AX for Retail.
Listed below is the barcode type – font name:
GS1-128 – BC C128 and BC C128 HD
Code 39 – BC C39 2 to 1, BC C39 3 to 1, BC C39 2 to 1 HD, BC C39 3 to 1 HD
Interleaved 2 of 5 – BC I25 and BC I25 HD
Code 128 – BC C128 and BC C128 HD
UPC A – BC UPC and BC UPC HD
UPC E – BC UPC and BC UPC HD
EAN13 – BC UPC and BC UPC HD
EAN8 – BC UPC and BC UPC HD
Subscribe to:
Comments (Atom)
-
FRMCACHE.DAT you need to enable viewing Hidden files from Tools->FolderOptions->View in Windows Explorer. from folder: Delete ...
-
1.Replacing Printheads If there is an error with one or more printheads, the printhead status is shown by four icons, referring fr...
-
 Show desktop icons in Windows 10 To view or Show them, right-click (or press and hold) the desktop, select View and select ...
